
By default, all items are shown in a view. To find specific items you can specify a filter. There are two options for filtering, you can use the quick search which is located on tool bar or you can use the filter dialog which allows for filtering on more than one field / value and has more options.
Quick Search #
The quick search option is available from the toolbar.

Using the Quick Search you can easily search on all values of the items at once. Looking for an item of the year 2023? Type 2023 in the Quick Search and Data Crow will search in all fields of the items for the value 2023.
Apply the filter by clicking on the ![]() icon or by pressing the Enter key.
icon or by pressing the Enter key.
Creating an Advanced Filter #
Menu Path: Filter > Filter
While the quick search is very helpful in finding your items in a simple and direct manner there might be a situation where you need to look for your items by filtering on multiple fields. Or, you find that you want to save a specific filter so that you can reuse and any point in time. In these cases the Filter tool is what you need.
Go to the filter dialog via the “Filter” button, which is available from the tool bar. The dialog has three tabs; the “Filter”, “Sort” and “Maintain”. In the filter tab the filter is defined. The sort tab allows for defining the way the result should be sorted and the manage tab allows for filters to be saved for reuse and saved filters to be deleted or edited.
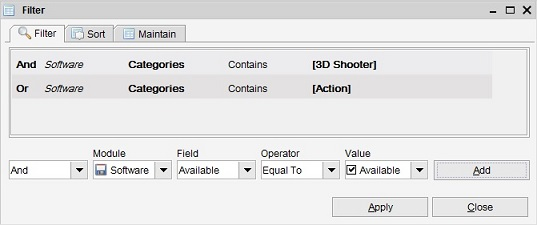
A filter is made up of entries. In the “filter” tab you can define these entries. In the lower part you define which field should be filtered on, the value and the operator used for comparison. After entering all the information press “Add” to add the entry to filter.
And / Or #
In the first list you can select the inclusion type, “and” or “or”. The first entry in the filter is always “and”, this cannot be changed. For the next entries however you can choose to include the entry as “and” or as “or”.
Example: You want to filter on movies having the state “seen” or “want to have”.
The filter should then have the follow entries:
And State equal to “seen”.
Or State equal to “want to have”.
Module #
The module you want to select a field from. Mostly this list will only contain the current module, such as the “Software” module or the “Book” module. However when a module has a child module such as is the case with the “Music Album” module (having “Music Track” module as child) you can select either the parent or the child module.
The selected module determines the fields to be shown in the fields drop down.
Field #
Shows the fields belonging to the selected module. Not all fields might be shown as there are fields on which no filter can be created.
Operator #
Here you can define how the value of the field should be compared. By default the “Equal To” operator is selected which means the value should be exactly the same. The operators speak pretty much for themselves (“is filled”, “is empty”, “contains”, ..). Note that you can create multiple entries for one field. This allows for filtering on one field using multiple types of operators (such as “is empty” combined with “or contains ‘test’).
All Field Types
| Is Filled. Field contains any value. |
| Is Empty. Field contains no value. |
| Equal To. Field value matches the value. Example: Data Crow Equal to “Data Crow”. |
| Not Equal To. Field value does not match the value. Example: Data Crow Not Equal to “Doom”. |
Text Fields
| Contains. Field value contains the selected or entered value. Example: Data Crow contains “Cro”. |
| Does not Contain. Field value does not contain the value. Example: Data Crow does not contain “Bo”. |
| Starts with. Field value starts with the value. Example: Data Crow Starts with “Data”. |
| Ends with. Field value ends with the value. Example: Data Crow Ends with “Crow”. |
Numeric Fields
| Is Less Then. Field value is smaller than the value. Example: 5 is Less Then 10. |
| Is Greater Then. Field value is greater than the value. Example: 10 is Greater Then 5. |
Date Fields
| Days Before. Field value is a selected number of days ago. |
| Days After. Field value is a selected number of days in the future. |
| Today. Field value is today. |
| Months ago. Field value is a selected number of days ago. |
| Years ago. Field value is a selected number of years ago. |
Value #
The way this field represents itself depends on the field you have selected. Either this will contain a list of fixed values or allows you to enter a value yourself (by typing).
Editing Filter Entries #
You can modify any entry in the entry list by double-clicking it. You can then edit the filter in the lower part off the screen. After making the desired changes you add the entry by pressing the “add” button.
Removing Filter Entries #
You can remove the entry by double-clicking it.
Sort #
In the sort tab you can define how the result should be sorted.
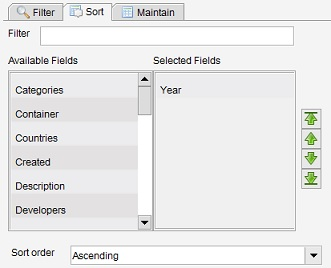
You can sort the items on multiple fields. Data Crow will sort the items based on the selected field list, top to bottom. If you have Year selected as the first field to sort on, Data Crow will also sort your items on year first. If you would add an additional field (underneath the Year) it will then first sort on Year and then on the next field.
You can change the order using the green arrow button.
Note that you can also select the sort order as well, to sort in either Ascending or Descending order.
Managing filters #
To manage filters you go to the “manage” tab. Here you can save a filter so it can be re-used. Saved filters will appear in the quick filter toolbar.
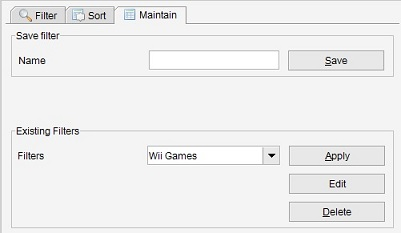
Saving a new Filter #
You can save a filter so it can be reused. In the manage tab there is an area called “Save filter”. Enter a name for the filter and press the “save” button. The filter is now saved and can be selected from the list in this tab or from the quick filter bar.
Modifying an existing Filter #
Select the filter you want to modify from the list in the “Existing filters” area and press the “edit” button. The filter tab is opened, showing the entries of the selected filter. Make the changes. Return to the “manage” tab to save the changes you have made.
Deleting an existing Filter #
Select the filter you want to delete from the list in the “Existing filters” area and press the “delete” button.
Applying an existing Filter #
You can apply a saved filter either by selecting it from the quick filter tool bar or by selecting it from the list in the manage tab by pressing the “apply” button.


