
Since Data Crow 3 it is possible to create your own modules. I have had many requests to add additional modules like a coin and a wine module. Using the module creation wizard you can now easily create the modules you are missing from the standard Data Crow installation. Additionally you can change existing modules by adding new fields for example.
Using the module creation wizard you can quickly create a new module. This manual has been created to ensure you can create the module you need.
General Tips #
- Always create a module in a clean installation of Data Crow. Just install a version of Data Crow to a different location then your production version. In this new and empty version you can experiment without having to worry about messing up your current installation. How to do this? Navigate to [Settings > Change Folder] and select a new user folder for testing purposes.
- You can share a module with someone else or copy a module you have created in your test installation to the production version. Use the [Modules > Module Export Wizard] to export your module. Import the module by at any other Data Crow installation by using the [Modules > Module Import Wizard]
- Describe on a piece of paper the fields you will need. Also define if you need lists of options a user can select from. You can create managed lists within your module. Meaning you can define a field called “genres” and make the content (the genres) manageable from within Data Crow.
- If you want to use lists as described in point 3, create the modules which will hold the items first. Most common these will be simple property modules for items like categories, genres, etc. Items of these modules have a name and an icon, nothing else. This will be explained further on in this document. Just remember that the fastest way to create your module is from the bottom to the top.
- Make sure to visit the field settings for your newly created modules. For example; the “is descriptive” setting determines the label of your items. This label will be used to display your items in the views, the grouping pane and in the reference fields.
Module Types #
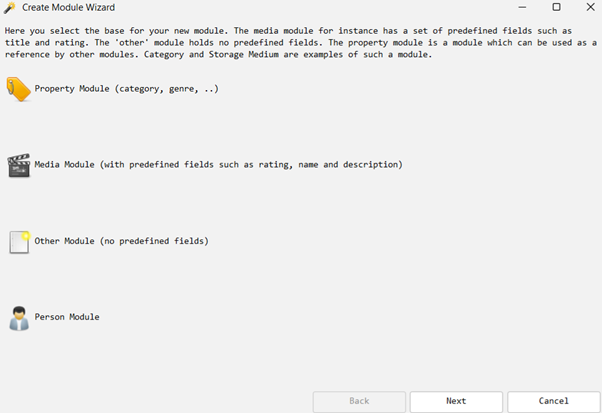
One of the first things you need to know is what every module type is and what it can be used for. There are three types of modules; property modules, media module and ‘other’ modules.
The type of module determines how the module can be accessed and which predefined fields a module has. Predefined fields (such as the ID) cannot be removed from the module (though they can be hidden using the normal field settings editor).
Property module type #
A property module is the simplest module type. Examples of property modules are the movie and music genres, the software category, the storage media and the platforms. Important to note is that a property module can’t have any reference fields and can’t have a picture field either.
A property module will never show up in the module bar. In fact it will not show up anywhere until used within another module. Its existence depends on other modules. This will be discussed later on in this document when we get to the field creation. When a property module has been used within another module you can manage its items via the [Administration] menu. Note that this is the [Administration] menu of the module using this property module.
Among other, system related fields, the following fields will always be present for property modules:
- Alternative Names (for synonyms of the same items)
- Name (name of the item)
- Icon (icon to represent the item)
Media Module Type #
This type of module is a fully functioning module. After its creation it will show up in the module bar from where it can be opened and used.

Items created within this module can also be managed by using the media module. The media module allows all items from modules of type “Media Module” to be shown in one overview.
Among other, system related fields, the following fields will always be present for media modules:
- Countries (Countries where the item was released)
- Languages
- Description (item description, long text)
- Location (free form location description of the item)
- Rating (10 star based rating)
- Title (title of the item)
- Year (year of release of the item)
Person Module Type #
The Person Module type has all the fields required for registering person information. Just as a property module will never show up in the module list neither will a person module. Person modules need to be used by other modules to be become apparent as a sub-module (see field creation chapter).
Among other, system related fields, the following fields will always be present for person modules:
- Webpage
- Description
- First name
- Last name
- Name (the full name of the person)
- Photo
- Tags (tag word registration)
‘Other’ Module type #
The other module type is almost the same as the media module type. The only difference is that it has less predefined fields (such as rating, title) and its items cannot be managed by using the media module.
Only system related fields are added for modules of this type.
Creating a New Module #
There are two ways to create a new module. One way is to manually create a XML file which describes the module and its fields. The second and easiest way is to use the module creation wizard. This document will describe the creation process using the wizard.
Start the wizard: [Modules > Create Module Wizard]
Step 1: selecting the Module Type
As described in the previous chapter you need to select the correct module type for your purposes. This information cannot be changed at a later stage.
Step 2: enter the Basic Module Information
In this step you have to enter the basic information for the module such as its name, its icons and a description. Most of this information can be changed after the module has been created.
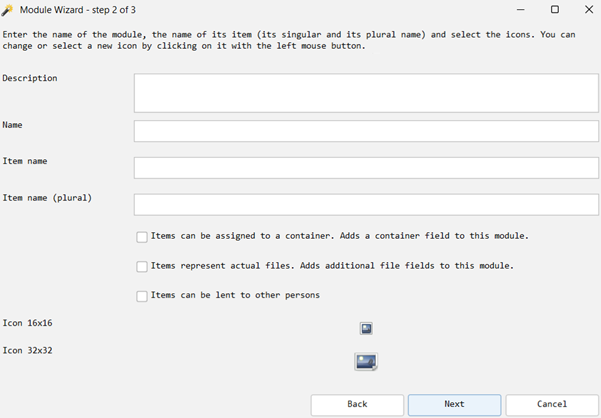
Below you find an overview of the information you have to fill here and whether this information can be changed at a later stage or not.
| Field | Description | Can be changed later? |
| Name | Name of the module. Example: Coins. | No |
| Item name | Name of an item belonging to the module. Example: Coin. | No |
| Item name (plural) | Plural name of items belonging to the module. Example: Coins. | No |
| Items can be lent to other persons | Indicates if the loan system should be activated for this module. If so, contact persons can lend items belonging to this module. This option is not available for property modules. | Yes |
| Items represent actual files | This adds file managements features and the necessary fields for file registration: filename, file size, file hash and file hash type. This enables the Drive Manager functionality for your created module. | Yes |
| Items can be assigned to a container | Adds a container field (where is the item located?). Having this field present will allow the item to be represented in the container module. | Yes |
| Description | A short description of this module. The description is shown when you move your mouse over the module in the module list panel. | Yes |
| Icon 16×16 | Small icon. This icon is used for the item form, reports, the table view and various settings panels. | Yes |
| Icon 32×32 | Large icon. This icon is used for the module list panel. | Yes |
Step 3: creating Fields
The third step of this wizard is where you can define the fields for your module. These fields will hold the information for each of your items. In the upper part of the screen you can see the predefined fields for the module. These fields are fixed and cannot be removed or changed. In the lower part all fields are shown which have been defined by you.
To create a new field you click the “Add Field” button. To remove a field you select the field in the list and press the “Remove Field” button. You can only remove fields from the “New Field” section.

Adding a new Field
After clicking on the “Add Field” button a dialog is opened. This dialog is used to define / create your field. It is very important to know that created fields cannot be changed at a later stage. They can only be removed and recreated.
The information to enter is detailed below.
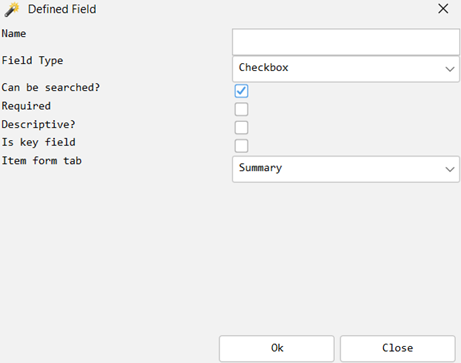
- Name
The label for this field. - Field type
Indicates what kind of value the field can hold and how it’s displayed. Each of the options here will be discussed in the next chapter. - Referenced module
In case you have selected one of the reference field types the referenced module list will appear. This is where you select the (for example) property module you have created such as a “Status” module. The referenced field will show all the items contained within the referenced module. - Can be searched?
Indicates whether users should be able to search on this. - Required?
Indicates whether it is mandatory for the user to fill this field. This can be changed using the [Settings > General Field Settings] option from within the Data Crow application. - Descriptive?
Data Crow needs to know how to describe the item of a module; what is the name of the item. By checking one (or multiple) fields as a descriptive field its content will be used to describe the item. For example, the title field of the book module is the descriptive field. This can be changed using the [Settings > General Field Settings] option from within the Data Crow application. - Is key field?
In case Data Crow has been configured to check whether an item is unique before saving it Data Crow will compare items based on the content of the key fields. Internally items are always unique as an item always has a unique identifier assigned. This can be changed using the [Settings > General Field Settings] option from within the Data Crow application. - Item form tab
Here you can indicate on which tab of the item form the field should be displayed. This can be changed by using [Settings > Item Form Settings] at a later stage.] - Maximum text length.
The maximum length of the value to enter. Only applicable and shown for text fields.
Field Types
The field type decides what kind of value you are going to store in the field (number, text, etc), how it will be displayed and it even determines how other modules are displayed!
| Field Type | Description |
| Checkbox | Stores a yes / no value. |
| Date Field | A date field with a calendar or date selection. |
| Decimal Field | Numeric field, decimal representation. The representation of the value (example: 1,000,000.00) depends on the locale settings. |
| File Field | A simple file field. Contains a browse button. |
| File Launcher Field | Can store a filename and is able to launch the associated file using the launch button. A file can be selected by using the browse button. |
| Number Field | Numeric field (example: 1000000). |
| Picture Field | Holds an image and is displayed in a separate tab of the item form.  |
| Rating Field | A 10 star-based rating field. |
| Reference Field, Dropdown | This field allows you to select items belonging to another module. The items of the module are displayed in this list. The module from which the items should be displayed should be selected as the referenced module. A good example of such a field is the storage medium field of the software module.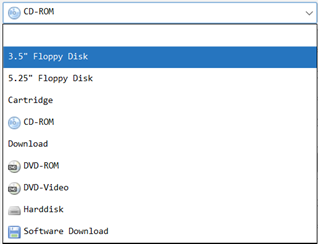 |
| References Field, Multi-select | Same as above but allows multiple items to be selected. Example: the countries field of the Software module. |
| Text Field, Multi-line | A large text field. |
| Text Field, Single-line | A single line text field. |
| URL Field | This field stores HTTP(s) URLS and is able to launch them in your browser. |
Creating a Reference Module #
Referencing one module from another is done through the field creation. Creating a reference has implication in how modules are shown within Data Crow;
- Property module; not shown until referenced. Shown in the [Administration] menu after it has been referenced. One property module can be referenced by multiple modules.
- Person module; not shown until references. One person module can be referenced by multiple modules.
- Media and Other module; shown in the module list as a main module (just like the Movie, Book and Software module). The selected module can be removed from the main module list after which it will be shown in the drop-down as a sub module (for example the Developers module is only shown as a sub-module of the Software module);
Only media / other module can be referenced by multiple modules.
Reference Module #
As shown above you have the option to use information from other modules in your own module. It is very common within Data Crow to use other modules to allow list content to be edited. Deciding to reference another module will also change the way that module is displayed.
How do you create a reference to another module? Simply by creating a reference field (“Reference Field, Single-Select” or “Reference Field, Multi-Select”) to another module. The screenshot below depicts adding a languages field to the software module. As a field type the “Reference Field, Multi-select” has been selected. The module “Language” is used to fill the content of the Languages field.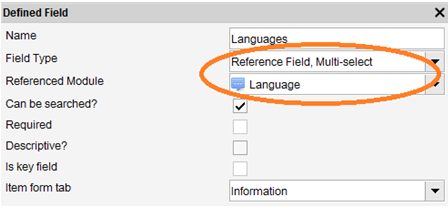
This is essential; you first create the referenced module (Language in this case) and then you add a field to the main module (Software in this case).
Referencing a Property Module #
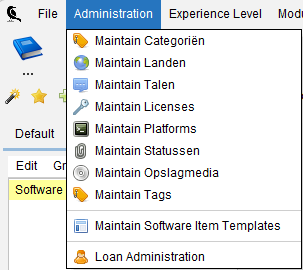
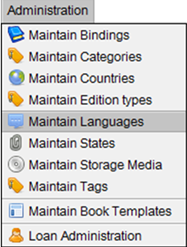
The property module type has been described earlier. One of the most important things to know is that this module will only be displayed once it has been referenced by another module. After you have created a reference to a property module it will become available from the [Administration] menu. A menu option called [Maintain <item name>] will be shown there. Using this option you can manage the items for this property module and thus also the available content of the reference field.
In the example below a references field was created to the Language module for the Software module. The languages can now be maintained through the [Administration] menu of the Software module.
Referencing any other type of module #
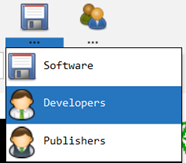
Creating a reference to any other kind of module works exactly the same as for property modules. However the result is little bit different. When creating the reference field you will be asked whether the selected referenced module should still be shown on the module bar. If you do so, nothing will change. However if you choose to no longer show the selected module on the module bar, the referenced module will be displayed in the module list, underneath your (main) module. An example is shown below.
The software module has two reference fields, one to the developer module and one to the publisher module. These modules are shown by clicking on the … button underneath the software module.
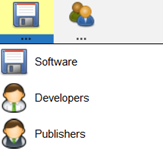
Selecting either of these sub-modules allows you to administer the containing items.
Relating Modules #
It is possible to create a parent child relation between two modules. A parent child relationship is something different then creating a reference between two modules. When a module becomes a child module its items can only exist when they have a relationship with a parent item. An example of this is the Music Track module, which has a parent child relationship with the Music Album modules. Music Tracks can simply not exist when there is no Music Album.
In case of a reference between two modules this is not the case. An actor can exist even when it is not referenced by a movie.
Creating a parent child relationship can be accomplished by using the “Relate Module” wizard (as can be found in the modules menu).

After the relationship has been created the items belonging to the child module can only be managed via the parent module. The item form of the parent module now has a separate tab where the child items are shown. This tab also allows you to create, update and remove child items. In case you want to manage the child items using a view the table view would be your only choice. The table view is capable of showing the parent item and its children in one view. The music album module is a good example where you can see this in action.
Copying Modules #
Instead of creating a module from scratch you can also choose to base a new module on an existing module. Use the Copy Module Wizard. In the first step you select the module you want to base your new module on. After this step you follow the same steps as if you were creating a new module. The main difference is that you will see all the fields, as defined in the module you are copying, already being populated.
Deleting Modules #
Custom modules, modules not delivered with the Data Crow product, can be deleted by using the “Delete Custom Module” wizard (which can be found in the module menu).

The last step of this wizard shows all the changes that have to be performed before the module can be deleted. Sometimes a module is referenced by other modules or the module is part of a parent child relationship. The wizard will alter these modules so that they remain functional after the selected module has been removed.
As stated before you cannot remove a standard module (delivered with the Data Crow product). However you can hide this module via the settings.
Distributing Modules #
After you have created and tested your module you might want to distribute it to other persons.
Exporting a Module #
The easiest way to do this is to use the Module Export Wizard [Modules > Export Module Wizard].
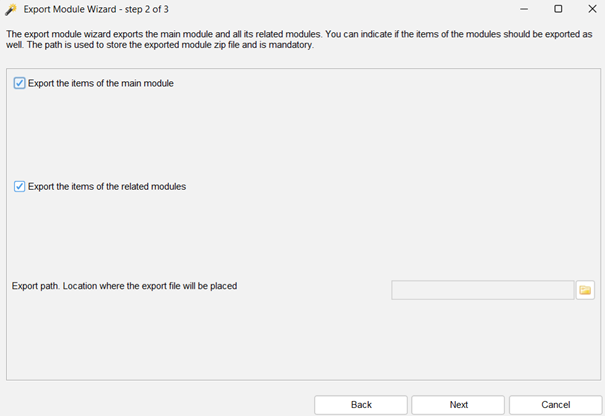
- Export the items of the main module
In case you want to make items of the main module part of the export, check this box. This is great in case you want to deliver one or more example items.
- Export the items of the related modules
In case you are using reference fields checking this option will also extract the information from these modules. This option is checked by default and it is recommended to leave it enabled.
- Export path
Path where the module will be exported to.
Press Next to export the custom module. It will include all the referenced modules, making this a complete package, perfect for distribution to other persons / installations of Data Crow.
Importing a Module #
To import a module you can use the Import Module Wizard. Just select the zip file as delivered to you and import it into Data Crow.
Altering Modules #
To customize an existing module start the [Modules > Alter Module Wizard].
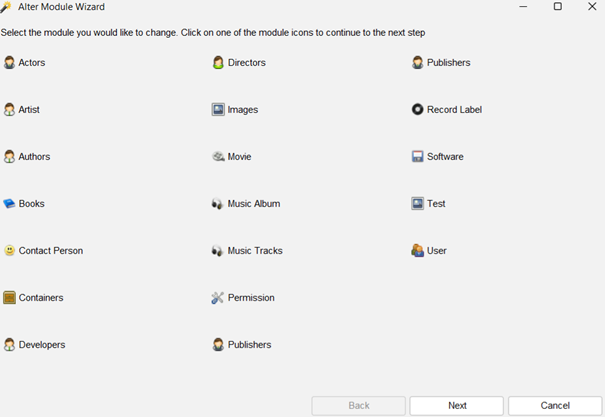
Select the module you would like to alter. It is not possible to alter property modules.
You can alter:
- The description of the module
- The icons
- Whether the items can be lend (disable / allow the loan administration for this module)
- Add / modify the fields of the module
Everything mentioned here is covered in the adding a new field section. What isn’t described though is what can be changed for existing fields.
Looking a the field overview gives a clear indication on whether a field can be removed and/or modified;
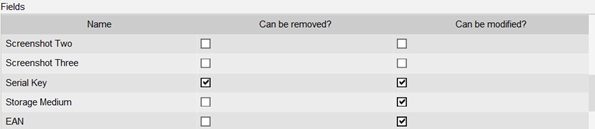
Some fields cannot be removed as they are expected to be there by other processes, such as online search or file information import.
Modifications which can be made to fields are:
- Changing a single reference field to a multi references field; if a field only allows for selecting one value but you want to be able to select multiple values simply change the type from Reference Field – Dropdown to Reference Field – Multi-select. Data Crow will makes sure the conversion is done correctly.
For example; you can change the Storage Medium field – changing the Field Type from ‘Reference Field, Dropdown’ to ‘Reference Field, Multi-select’. - Text field – Single Line fields can be changed to:
- File Field
- File Launcher Field
- Reference Field (single and multi-select);
Data Crow will convert all existing values to references. Let’s say you have always had a text field for status and you typed in Open or Closed for multiple items, you could change the field to a reference field. Data Crow will save the values Open and Closed as references and apply these to the corresponding items (which previously held the text value). - Text field, multi-line
- URL field
- There are many other conversions which can be done. Main thing to remember is that Data Crow will only allow you to make changes which prevent loss of data (with the exception of field deletion of course). So you won’t be able to change a multi-reference field to a single reference field.


